

Very Low Viscosity – From Wayne’s Archives
This is another post for hearing archives – information unpublished, but in need of being recorded somewhere as part of the hearing discipline. In this post is information related to early low viscosity ear impression material.The ear impression material used to make ear impressions is generally of lower viscosity than used in the past. In some cases, the purpose is to obtain a more complete and accurate impression of the entire ear canal than what higher viscosity materials have allowed.
For clarity, viscosity is resistance to flow, so a high viscosity material is very thick and has trouble flowing – like honey. A substance having low viscosity, on the other hand, flows very easily – like water.
While we often look at low viscosity ear impression material improvements as something new and different, as is often the case, low viscosity ear impression material has been used in the past – and I mean as long ago as 1970 or so. In fact, the impression material may have had lower viscosity than any ear impression material currently being used, I believe.
We also think, generally, that silicone ear impression material is relatively recent. But, my first experience with it for ear impressions was in about 1969-1970. I was visiting the Audiotone Hearing Aid Manufacturing facility in Phoenix, Arizona for a facility tour and educational program. It was during the tour that I had the following described procedure performed on me. As an audiologist, I had never seen it before then. I recall it being painless, efficient, and very duplicative of my ear canal: the best ear impression of my ear that I had seen. It was certainly much better than the first one taken on me while I was in undergraduate school in 1962. That one was made of plaster of Paris, and made by a Beltone hearing aid dealer from Wichita, KS (no reflection on the dealer because he knew what he was doing, and audiologists were years away from being so engaged). I “volunteered” for that, not having any idea what an ear impression was even for. I suspect that the finished impression managed to duplicate the concha and perhaps the entrance of the ear canal to a depth of about 5 mm. One had to be cautious and not go too deeply because plaster of Paris sets up hard, and removal, if too deep, could create problems.
But, flowing silicone, years ago?
Surely, You Jest! Say it Isn’t So!
And if so, did it have sufficient thixotropic (low viscosity, but not runny) characteristics to be applied to the ear? Interestingly, while being thixotropic seems to be an issue currently, it was not a concern back then with this material and procedure.
Lloyd’s “Free Pouring” Ear Impression Material
I believe that Lloyd’s “Free Pouring” Ear Impression Material was the first ear impression approach to provide an alternate method to the standard “forced in” type ear impression material, which was generally powder and liquid at the time of my exposure. This alternate method used a free pouring liquid silicone mixture. It was advocated where very secure sealing was necessary for high gain ear level hearing instruments.
All the necessary materials and tools were packaged in a single kit (Figure 1). They included:
- Lloyd’s mixture impression material
- Catalyst for mixture
- Silicone putty (to be used in front of ear to prevent outward flow of material)
- Thread (for tying the cotton blocks – before commercially tied otoblocks)
- Cotton
- Throwaway wood spatula
- Medical scissors (blunt nose) – for ear hair trimming
- Blunt end tweezers
- Disposable ear protector (to keep material out of the hair)
- Ear light
- Neck pillow (Guardian)
- Neck pillow (Cervipillo)
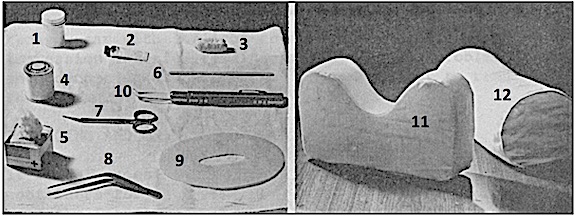
Figure 1. Materials and tools for making the first poured ear impressions.
The impression material was packaged in an unbreakable plastic jar, and contained sufficient mixture for one impression. The silicone contained its own release agent, so pre-oiling of the ear and ear canal was not required.
There were similarities in the preparation of the client relative to otoscopic examination, case history, etc. to today, but the procedure differed as follows:
Preparation
-

Figure 2. Client preparation: ear protector, rolled strip of silicone putty in front of the ear to prevent material from flowing out, and showing the insertion of the hand-tied cotton block.
Because the impression was made with the head in a horizontal position, a neck support pillow was placed tightly under the neck and rest the head on a second pillow, like or similar.
- An ear protector was placed over the ear and a rolled out strip of silicone putty was formed and placed directly in front of the tragus and extending to the tip of the lobe (Figure 2). This prevented run-off and made it possible to include the tragus in the impression.
- A cotton plug (otoblock) was Inserted into the canal and terminated beyond the isthmus.

The material

Figure 3. Catalyst being added to silicone to allow for hardening of the impression.
- The mixture (15 cc per jar, for one impression), was stirred thoroughly until the white residue at the bottom of the jar was completely blended.
- Eight drops of catalyst were added and stirred vigorously until the mixture was uniformly pink in color. This took no longer than about 20 seconds (Figure 3).
Taking the impression
- A very thin stream of mixture was poured high into the anti-helix (Figure 4), allowing material to flow down the side of the canal. (This had to be done slowly and easily to permit air to escape from the canal. Pouring too rapidly would fill the canal, trapping air, and resulting in a short or partial impression of the canal).
- Pouring was continued until the helix and concha were completely filled as shown in Figure 5.
- The thread (from the otoblock) was straightened to protrude near the center of the impression.
- The mixture was fast setting, with the time required to complete the impression between 2.5 to 3 minutes.
- The residue in the plastic jar was checked. When tacky to the touch, the client was returned to a comfortable position and the strip of silicone putty from the front of the ear was removed. This allowed better air flow for the ear impression to set up.

Figure 4. A very thin stream of mixture was poured high into the anti-helix. Keeping the stream thin and flowing was important to not trap air and ruin the impression with air bubbles.

Figure 5. Pouring continued until the entire ear canal (to the block), concha, and outer features of the ear were filled.
Removal of the impression
- After the mixture was properly cured (about 3 minutes from removal of putty strip), the ear was released from the impression – NOT the impression from the ear.
- After the impression was completely freed from the outer surfaces of the ear, the canal portion was removed by exerting pull or outward pressure on both the thread and the impression.
- Unfortunately, I have no images of a finished ear impression using this procedure.
Afterthought
Readers may have noticed that I volunteered to have a plaster of Paris and a poured silicone ear impression made of my ear canal. One other thing I volunteered to have done to me (it was said that I really should experience this), was bilateral ice water calorics. I would definitely recommend against this.