
Two previous blogs related to the behind-the-scene interaction of the tympanic membrane (TM) to the hearing aid fitting process focused on basic anatomy, especially that related to ear canal length (Part I), and to a better visualization of the TM orientation compared to general artistic renderings (Part II). Part III will draw these issues together and describe how they interact with the taking of ear impressions, and why these issues should be taken into consideration when fitting a hearing device into the ear canal.
Taking Ear Impressions
This is the time in a movie when the arrows would start to find their range and the fury of the archers would be represented by the number of arrows that were shot at the target. How many will have legitimately hit the target? In the commentary that follows, I suspect that whatever the arrows hit was the target. The arrows’ aim will most certainly be directed at the message, and likely ignore the facts.
What might cause such fury over a seemingly irrelevant topic? It is because, I believe, that essentially every document that instructs individuals on how to take ear impressions provides false information. So, bring on the arrows and take your best shot. Having been in the hearing aid industry for a long period of time ensures a thick skin.
A Major Problem, As I See It:
Documents related to taking ear impressions almost always state something like the following: Place the block just past the second bend of the ear canal, but be careful not to have it come in contact with the eardrum. Documents then go on to show the result of what is called a “perfect ear impression” (Figure 14). And, in my opinion, it is very nice looking and should be an ideal ear impression from which to fabricate an earmold or custom-molded hearing aid product.
Figure 14. This ear impression might be considered a “perfect ear impression.” The block was most certainly against the tympanic membrane.
My response: Generally, such instructions are misguided (I chose this term over “foolish” and “nonsense”).
A cotton block (or other type of block) is roughly 6 to 10 mm in diameter. If the average ear canal is about 25-26 mm in length, placing a block just past the second bend will usually end up with an ear impression leading to one of the following (use Figure 15 to follow this discussion):
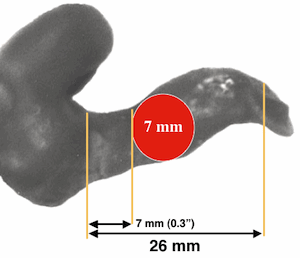
- Too short an ear impression (plenty of the concha, but almost always too short on the canal portion). In this example, about 7 mm in length (0.3”).
- A final earmold that fits fairly well because the earmold labs have instructed dispensers that the cotton block be left on. This adds an additional 7 mm (roughly) to the final earmold, for a total length now in point “1” of about 14 mm. Not a bad length. An earmold can be made from this combination of canal impression and block, providing that it is filled out and still has the cotton block attached. In such a situation, the earmold laboratory would use the cotton block as a further “impression” of the ear canal. This further extension may or may not actually represent the true configuration because the block is a non-conforming material and does not hold its shape. This would be even truer when related to the use of foam blocks. The irony of making an earmold from this configuration is that the area most critical to providing a proper fit is left to guesswork – the area represented by the block. That an earmold made on this guesswork often functions “acceptably” has given comfort to many, and, as a result, has contributed to this recommended procedure.
- A third result could be a fairly long ear impression. This often occurs by accident because the block has passed the narrow isthmus of the ear canal and then “slips/drops” easily into a larger cavity beyond. To experience this “slip/drop” when inserting the block is an indication that the block is too small. But, teaching suggests pulling easily on the string attached to the block, and determining if there is some resistance to the pull. This can certainly happen because the block now again meets the narrow isthmus area. The result is that because some resistance to the slight pull is felt, the assumption is made that the block is properly inserted. The problem with this is that when ear impression material is injected into the ear canal, the block, because it is too small, is readily forced more deeply into the ear canal until it meets resistance – which is, the TM. A tell-tale sign to this happening is that the patient’s head will “jump away” from the injection tool in reaction to the block being “forced” against the TM. The pressure exerted on the syringe, and the type of ear impression material are significant factors. In this case, a long ear impression is taken, but accidently. This occurs in spite of the instructions related to the block. At other times, the patient will comment, or flinch, when the block comes in contact with the TM. This is typical. However, even when the block is considered appropriate, the pressure from the syringe forcing the impression material into the ear canal commonly pushes the block back against the TM. The extent to which the injection process influences the final position of the block depends on both the Shore hardness and the viscosity of the ear impression material, as well as the type of syringe or impression gun used.
- An ear impression with blow-by. Many impression-taking instructions ask that the string on the block be used to hold the block in position. The problem with this is if the block is too small, ear impression material will take the path of least resistance and flow around the block, often reaching the TM. Whenever one sees ear impression material around the sides of the block, it should be obvious that the block was either too small, or that it was incorrectly placed.

Figure 15. A typical complete ear impression showing that if the block is placed just past the second bend, and if the injection of ear impression material did not force the block more deeply, a canal length of approximately 7 mm would result – hardly sufficient for a hearing loss that required a good earmold, and not create an occlusion effect. That is, unless it is intended to be a very open fit (vent larger than about 3 mm).
A Dose of Reality
A mechanical model of an ear canal, in length only, is shown in Figure 16. I realize that this is a rather poor cosmetic model, but the concept should still be clear. If the ear canal is 25 mm in length from the center of the TM to the aperture of the ear canal, placement of a block in the ear would take up about 7 mm of the total length (assuming that it would be compressed somewhat as it is put into position). The block shown is a large block from Westone. In the following photos, the red box outline represents an ear canal of 25 mm in length to the center of the TM. The blue box outline shows the length to the bottom (longest distance) of the TM. (Note that the tick marks on the syringe ear canal are not in mm, but in milliliters, so disregard them and reference the mm ruler).
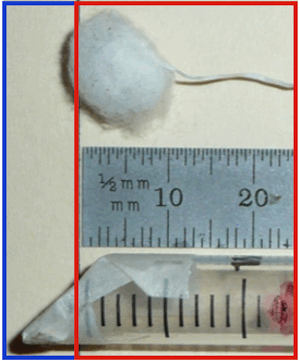
Figure 16. Artificially-created ear canal showing a total length of 25 mm (red mark on right) to the center of the TM. Based on the image, with a large block in the ear canal, about 40% of the ear canal would be filled by the block. In reality, and also fortunately, the block ends up being somewhat compressed, and in most cases, ends up being pushed against the TM, allowing for a reasonable ear impression to be taken.
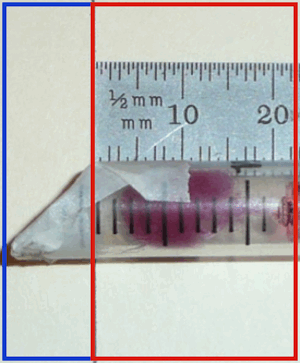
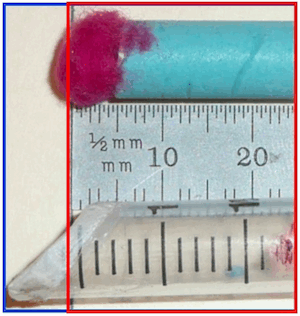
Figure 17. A cotton block (made red for better visibility) positioned about half way into the ear canal. If positioned just past the second bend, it would be in contact with the TM.
Figure 17 assumes a block placement just past the 2nd bend of the ear canal, the “recommended” placement. The cotton block has been colored red for better visibility. Unfortunately, I did not trim the masking tape TM, so visualization is more difficult. The block does not come in contact with the TM, but it is close at the top.
Figure 18 shows what happens to the insertion process when using traditional Shore hardness and viscosity ear impression material, with either a syringe, or gun. The block is pushed against the TM. Believing that the block “protected” the TM because it was not placed against the TM, has no serious support. Standard procedure was used for injection.
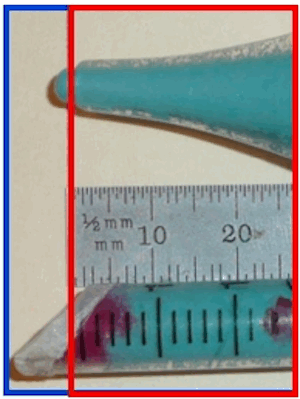
Figure 18. A most frequent result of injecting ear impression material into the ear canal with a block set “just past the second bend.” The pressure of the injection process pushes the block more deeply into the ear canal. When this combination of block and impression material “hits” the TM, the patient “flinches,” a clear indication that this has happened.

- Figure 19. The resultant ear impression, which consists of the block and impression material following the “push” of the block against the TM.
The resultant ear impression is shown in Figure 19. Note that even if cut off at the start of the block, the ear impression would still be 17-18 mm in length, which would make a nice earmold. But, this would not have occurred unless the block bottomed out against the TM.
Solution: Place the block against the TM to begin with. Horrors!!!!!!! I can see the crossed sticks coming out already and I think I just received at least four arrows in my butt (my largest target). But, why not just put it there to begin with, because in essentially every good ear impression, it ends up being there anyway. So, why not start from a known position rather than an unknown and dubious location? If this length ear impression is not desired, use a longer block, but still, place it against the TM.
If one gets an ear impression (minus the block) with a canal that is anywhere near 18 mm in length, it is almost certain that the block ended up against the TM. This canal impression length could even be less for those having shorter ear canals.
Won’t placing the block against the TM be dangerous and damage the TM? Keep in mind that a very high percentage of good ear impressions end up with the block in contact with the TM. So, why not put it there initially and reduce the number of errors and poor ear impressions that are still being made? A block is not a sharp item against the TM, but spreads out over the entire surface area. This assumes that the block is made of cotton (or similar material), rather than foam blocks. (I realize that many people use foam blocks, but, to me, foam blocks are often an accident waiting to happen. Besides, they seem to allow ear impression material to move around them more easily, and do not have the fibers of the cotton to catch and hold ear impression material attempting to move around the block). A cotton block against the eardrum generates less pressure than individuals experience under water in the deep end of a swimming pool, and most generally less than irrigation of the ear canal (which often also involves multiple violations of the TM). If this were damaging, then why don’t we see more eardrum trauma following the taking of ear impressions when we know that the injection insertion pressure forces the block against the TM?
Most of the problem issues I have seen during 40 years in the hearing aid industry relate to blow-by of the impression material, resulting in a more difficult removal process, and not damage related to the TM. Or, the eardrum already had a perforation, and coupled with a poor block, impression material blew by the block and penetrated the middle ear cavity. However, even under this condition, if the block were against the TM to begin with, it would seem to lessen the opportunity of blow-by of impression material because it would encounter a fixed block against the TM, reducing the possibility of blow-by. The TM is actually stronger than most give credit*. When you place the block against the TM, inform the patient that you are going to place the block aginst the TM, and to let you know when this occurs. Then, proceed in a cautious manner to carefully place the block against the TM. This should not be a test of Sampson bringing down the temple, but the block should be solid and tight. The patient’s reaction to the block against the TM generally comes before their verbal confirmation. This happens even when attempting to place the block just past the second bend. Most dispensers experience this patient reaction on a daily basis, but fail to understand what is happening. Even a block “just past the second bend” is most often in contact with the TM. Ear canal length numbers are what they are, and especially when one calculates the 45 degree angle impact on when a block may reach it (protruding up to 5 mm toward the opening of the ear canal of the TM), the possibility of the block making contact with the TM is to be expected .
Tympanometry: Of course, care should be taken whenever anything is placed in the ear canal. No ear impression that is intended for serious use should be made without the use of at least screening tympanometry. Video otoscopy is fine to visualize the ear canal and any potential issues that might arise by placing anything into the ear canal, but tympanometry should identify any perforation – something that one might be unable to identify with a visual inspection (most often a lack of knowing what to look for or too poor a light source). I could be wrong, but I think that many who use an otoscope have no idea as to what they are looking at or what they should be looking for. And, by the way, disposable otoscopes should just be that – disposable. Throw them away before you use them. Do not use anything that does not have a strong light, and some magnification. Better yet, use a headlamp in addition to whatever you do. Few locations have good light, so couple that with people who have poor close-in vision or shaky hands, and you have accidents waiting to happen.
Fitting Hearing Aids Without Ear Impressions
Many fitting systems today do not require an ear impression because they use soft, formable ear tips to deliver sound to the TM. I see this as a positive development for those who can be fitted this way. It certainly eliminates the risks of ear impression material being delivered improperly, pulled hematomas, bleeding in the ear canal, problems with removing ear impressions that are made sufficiently deep to provide for effective sound delivery, etc. RIC/RITE (Receiver-in-the-Canal/Receiver-in-the-Ear), and open-fit hearing aids are good examples of fitting developments that avoid ear impression problems.
New 3D scanning technologies help circumvent many ear impression-taking problems and issues. These are a topic for another discussion, but expect them to have an impact on the way impressions have been taken historically.
Still, even with fittings that do not require ear impressions, it is possible for the tip on the hearing aid speaker link to reach the TM of some individuals. Having a good understanding of the ear canal anatomy and issues identified in this three-part presentation should help avoid reported problems and provide a rationale for solutions. Fortunately, most speaker links provided by hearing aid manufacturers limit the insertion depth to avoid TM contact. The shorter speaker link lengths are limited to a shorter insertion depth than are longer speaker link.
Ouch!
I do have to take serious cover now because the arrows are dropping in from all over. I just hope that I survive to blog another day!
* Eardrum breaking strength for positive air pressure (cadavers){{?}}[[?]] Zalewski, T. Experimentelle Untersuchungen über die Resistenzfähigjeut des Trommelfells, Zeits. F. Ohrenheilk, 1906, 52, 109-128[[?]]:
- Normal-appearing membranes: 0.4-3.0 X 10⁶ dynes per sq. cm (Mean of 111 ears: 1.61 X 10⁶ dynes per sq. cm)
- Abnormally thin membranes: (Mean of 12 specimens: 0.52 x 10⁶ dynes per sq. cm)
- Scarred membranes: (Mean of 12 specimens: 0.3 X 10⁶ dynes per sq. cm)
When free-diving:
- The pressure exerted per foot of water depth is 0.433 psi (3kPa) above atmospheric pressure.
- At about 12 feet depth, the pressure will be about 5 psi (35kPa) above atmospheric.
- At this pressure (exerted on the outside of the eardrum by the water), acting against the normal atmospheric pressure inside, can be sufficient to rupture the eardrum.
With an overpressure of 100 kPa (32 feet depth and 14 psi), almost everyone’s eardrums will be ruptured.